 |
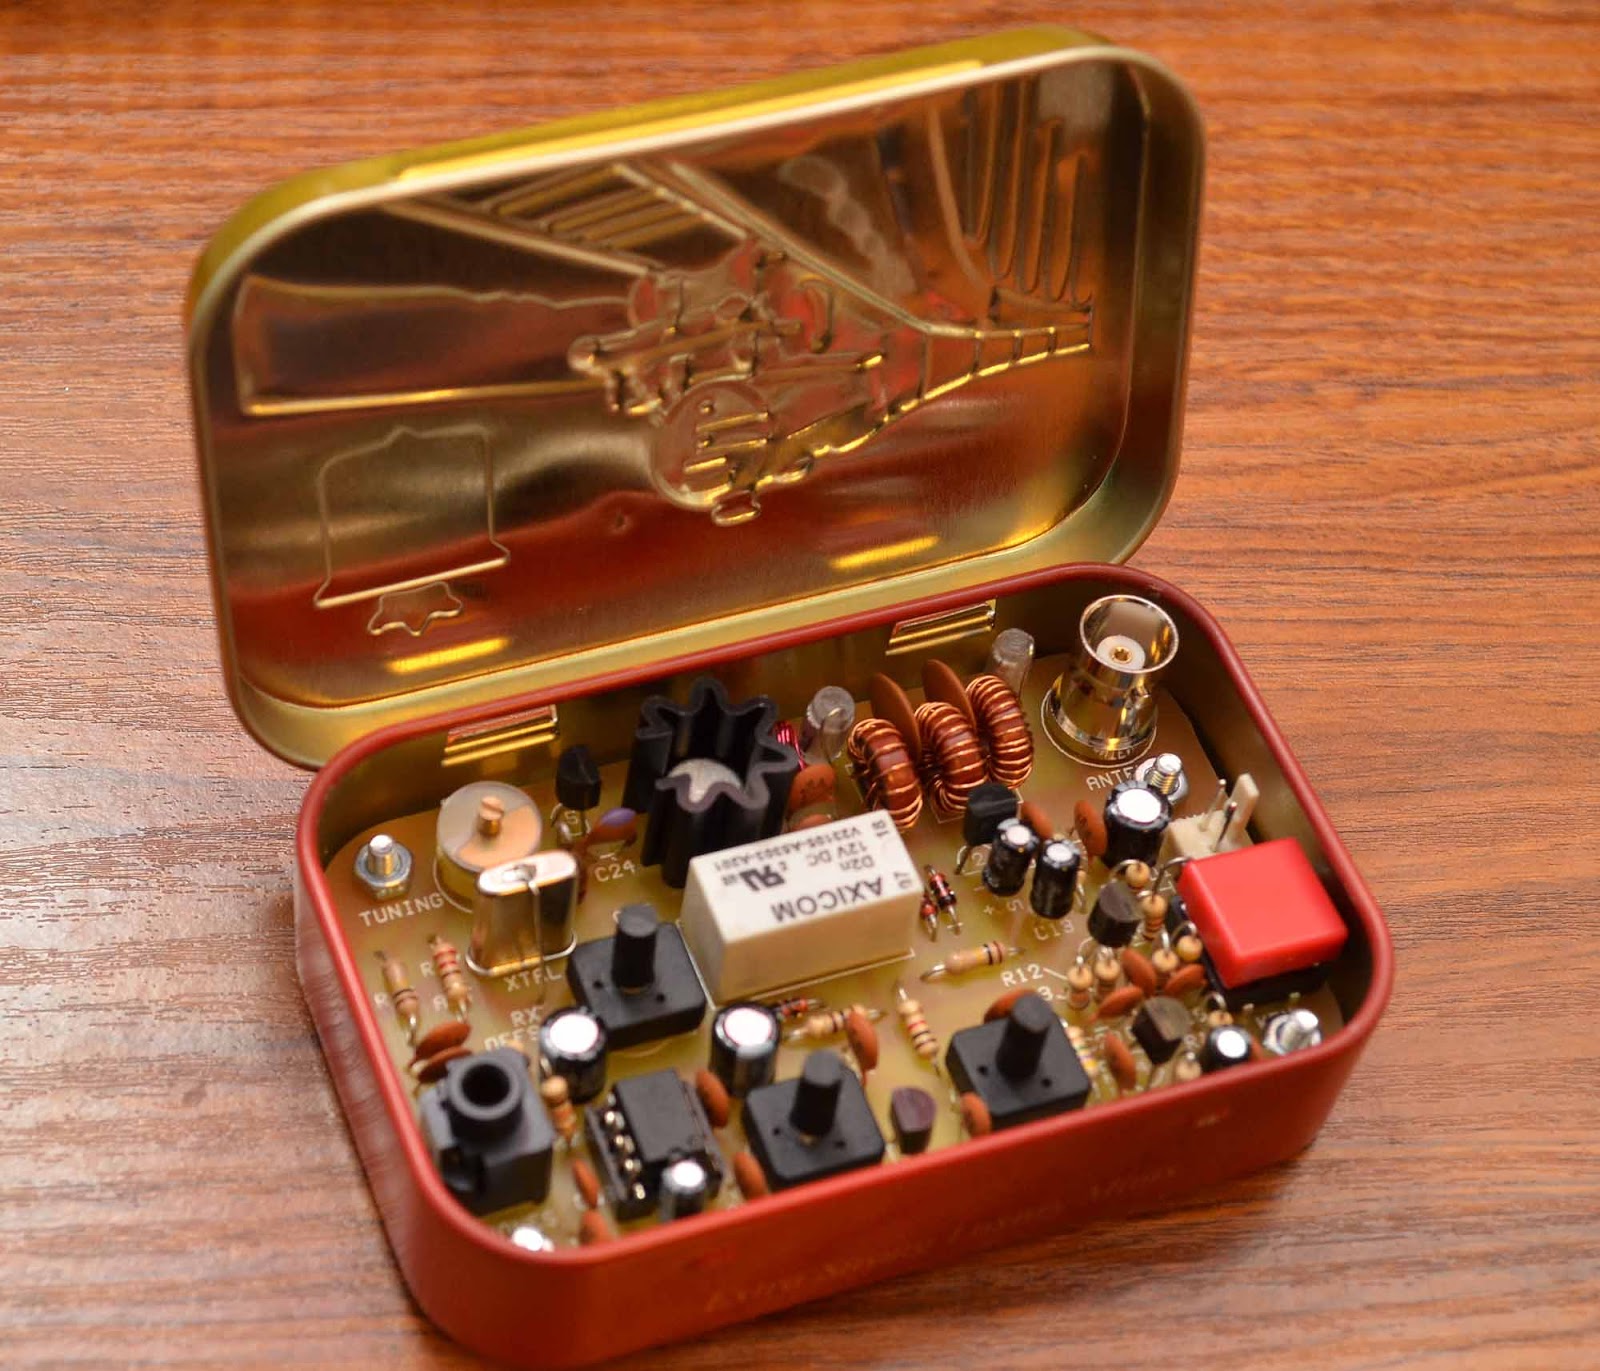
| The 40m Foxx-3 - the big red button is the Morse key. Click to enlarge any image on this page. |
Back in July I wrote
about the 20m
Rockmite I built into a Stewart's mint tin. Well, now it has been
joined by a 1W 40m FOXX-3 transceiver, also from Kanga
Kits in the UK, but this time we have a steam locomotive on the
lid.
The Foxx-3 is a
well-known design that has evolved from George GM3OXX's original Foxx
into its latest “-3” incarnation, designed by Derek G4GVM.
I won't go into how
it works – you can find out more on the Kanga
web site.
The build was quite
easy – the first thing to do it drill the mint tin for the PCB
stand-offs and open up the holes with a needle file. I used the PCB
as a template for that.
The build sequence
has good documentation, all the stages are in different bags and you
can test each stage as you go.
The first stage to
build is the audio amplifier with an LM386 and you test that by
touching the volume control connection and seeing if it hums – no
problem.
The second stage is
the keying circuit, which again is easy to check. I opted for the
push button Morse key on the board rather than a socket for a Morse
key as this is really just a toy for me.
A slight amount of
switchover delay is set by the value of a resistor. I stayed with the
suggested value and that seemed fine.
The third stage is
the sidetone circuit, which once again worked first time.
Stage four is the
crystal oscillator and I had an issue here that when I keyed up the
TX note was very wobbly. I read elsewhere that this can be normal
until you build the final stage to give it a decent load. This turned
out to be the case.
 |
| Testing testing! |
The final stage is
the power amplifier and filter, complete with four tiny toroids.
Again, not difficult, but make sure you get the coating off the
enamel before you finally solder the toroids in. I used a drop of
molten solder on the iron to do this and it seemed to work OK.
The final stage was
to put the BNC on the board and I had to increase the temperature of
the iron for this as it acts as an effective heat sink.
Finally, it was a
case of wiring it up to a 12V lithium ion battery, connecting a a 40
OCFD antenna and headphones and seeing if it worked.
The power output was
just under 1W so I left it as it was – you can change a resistor to
increase/decrease the power level up to 1W maximum.
 |
| Well, the RBN picked it up even if no one came back to me. |
I think that once it
is set it is best to leave it.
I also found that I
needed to use my ATU to avoid AM breakthrough on my W5GI dipole –
the 40m Windom was OK. I had been warned about this.
 |
| The finished item in a Stewart's mint tin. |
A few CQs using the
built-in Morse key had me spotted on a few RBN skimmers in Europe.
You can see that my reported speed varies from 13-15wpm as it is very
hard to be consistent with a push button Morse key! It is also hard
to send the highly-accurate Morse needed for skimmers to decode you,
so I was pleased to be picked up in the UK, Ireland, Belgium and
Germany during the daytime.
The reported 15-20dB
SNR means it should be possible to work people with 1W, although
no-one has come back to me yet and I haven't heard anyone call CQ who
has been spot on my frequency.
The receiver is
reasonably lively and you'll hear anyone who can hear you I guess.
The only issues were
mechanical – make sure that when you put it in the mint box that
you have enough room for the BNC plug to fit. I need to open up the
holes on the PCB board by about 0.5mm to allow space for it to be
connected. Doh!
I also had to grind
down the three controls on the variable resistors to allow the lid to
shut properly.
In all then, the
Foxx-3 is a great little kit to make and it obviously works. Don't
expect Elecraft KX-3 performance though! It only costs £29.95.
I do think that you
will work other hams on it though, at least on the 40m version, and
my thanks to Dennis at Kanga for selling it. The next project is an
Elecraft K1 kit that I bought back in Christmas 2004 and has been
living in the loft unassembled ever since. Shame on me!
Incidentally, the
tiny zip-up nylon camera cases for sale in Poundland are ideal for
storing and carrying mint box radios like the Rockmite and Foxx-3.


Steve,
ReplyDeleteFB build.
It is a great conversation piece operating on a bench or sitting on a beach with a fishing pole etc with the lid open but I found it was easier to operate in odd WX conditions (unless had the KX3) with these to use a BNC chassis @ 90' to the PCB and the other connections and stick them out of the side of the tin, much like the rock mite. That way you do not need to open the cover during operation.
The push button morse key... as it comes with a mono 3.5mm socket in another tin (I have a pico keyer N0XAS in a mini Altoid tin and swap it from rig to rig) I expect you could use the Kanga keyer too.
Dom
M1KTA
No more Kanga Kits!
ReplyDeleteThey just closed for good.
No They havent, its just started up again, still setting up at the moment the web site says, buts a new range of kits are on the site now anyway, I believe many of the old kits are going to comeback too :-)
Delete